修订说明:这篇文章的初稿写于 2021 年。本次重新核对了 Vue 3.5.41 的文档与源码,修正了原文中的代码错误和架构表述。文中的实现仍然是为了讲清主流程而设计的最小版本,不是 Vue 源码的逐行复刻。
runtime-core 是 Vue 里很适合用来建立整体认识的一层。组件怎样变成 VNode,VNode 怎样交给渲染器,组件的 setup 和 render 又怎样参与首次渲染,这些问题都能在同一条链路上找到答案。
这一篇只处理初始化。更新调度、节点复用和 keyed diff 留到下一篇。
本文参考:
先把边界说清楚
runtime-core 本身并不知道浏览器 DOM。它描述组件、VNode 和通用渲染流程;真正的 document.createElement、属性更新和事件绑定在 runtime-dom 中实现,再作为宿主操作交给核心渲染器。这层分离让同一个 runtime core 不只可以渲染到浏览器,也可以被自定义渲染器用于其他宿主环境。
为了让代码容易阅读,本文会实现一个只面向浏览器的最小渲染器,但会把 DOM 操作收在 rendererOptions 中。这样既能看见实际发生了什么,也不会把平台能力误认为 runtime core 的职责。
从模板到 VNode
我们通常在单文件组件里写模板:
<template>
  <div>{{ msg }}</div>
</template>

<script>
export default {
  setup() {
    return { msg: 'hello world' }
  },
}
</script>
浏览器不会直接执行模板。构建时,Vue compiler 会把它转换成渲染函数。忽略编译器生成的优化指令后,可以把结果近似理解为:
import { h } from 'vue'

export default {
  setup() {
    return { msg: 'hello world' }
  },
  render() {
    return h('div', null, this.msg)
  },
}
真实的编译结果会使用 openBlock、createElementBlock 等辅助函数,而不一定直接调用 h。这里保留 h,因为它更适合解释渲染函数的输入和输出。
h() 接收元素类型或组件、props 和 children,返回一个 VNode。它不是简单的名称替换,而是一个便于手写渲染函数的入口:先处理不同的参数形式,再委托给 createVNode()。
const vnode = h('div', { id: 'message' }, 'hello world')可以把得到的对象简化成:
const vnode = {
  type: 'div',
  props: { id: 'message' },
  children: 'hello world',
  el: null,
  shapeFlag: 0,
}
VNode 的价值不只是“用对象描述 DOM”。更重要的是,渲染器可以先处理一棵普通 JavaScript 对象树,再由宿主操作决定最终创建什么。更新时,新旧两棵树也有了可以比较的中间表示。
VNode 是一棵树
考虑一个手写的渲染函数:
render() {
  return h('div', null, [
    h('p', null, 'hello'),
    h('p', null, 'world'),
  ])
}
它产生的结构可以画成一棵树:
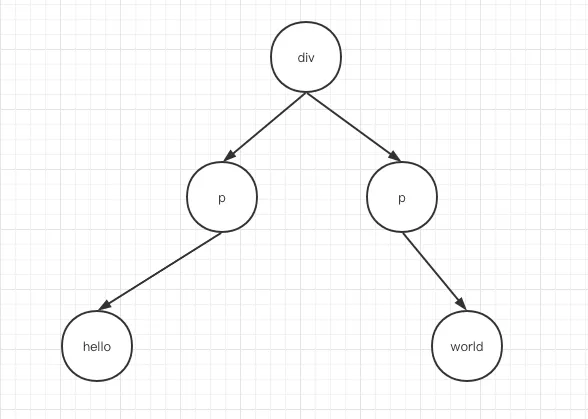
数组里的元素 VNode 会继续展开;字符串 children 在需要时会被规范化为文本,或直接作为元素的文本内容处理。真实 Vue 还要处理 Fragment、Comment、Static、Teleport 和 Suspense 等类型,本文先保留两条主干:组件和普通元素。
用位标记描述节点形状
渲染器经常需要回答两个问题:这是组件还是元素?它的 children 是文本还是数组?Vue 用可组合的数字位标记 shapeFlag 保存这些信息。
教学版只需要四个标记:
export const ShapeFlags = {
  ELEMENT: 1,
  STATEFUL_COMPONENT: 1 << 1,
  TEXT_CHILDREN: 1 << 2,
  ARRAY_CHILDREN: 1 << 3,
} as const
每一位代表一个独立事实,因此元素类型和 children 类型可以同时存在:
export function createVNode(type, props = null, children = null) {
  const vnode = {
    type,
    props,
    children,
    el: null,
    shapeFlag:
      typeof type === 'string'
        ? ShapeFlags.ELEMENT
        : ShapeFlags.STATEFUL_COMPONENT,
  }

  if (typeof children === 'string' || typeof children === 'number') {
    vnode.children = String(children)
    vnode.shapeFlag |= ShapeFlags.TEXT_CHILDREN
  }
  else if (Array.isArray(children)) {
    vnode.shapeFlag |= ShapeFlags.ARRAY_CHILDREN
  }

  return vnode
}

export function h(type, props = null, children = null) {
  return createVNode(type, props, children)
}
检查时使用按位与:
if (vnode.shapeFlag & ShapeFlags.ARRAY_CHILDREN) {
  // children 是数组
}
这和把类型存成字符串不同。一个 VNode 可以同时是 ELEMENT 和 TEXT_CHILDREN,不需要在两个标签中二选一。
从 createApp 进入渲染器
应用从根组件开始:
const App = {
  setup() {
    return { msg: 'hello world' }
  },
  render() {
    return h('div', null, this.msg)
  },
}

createApp(App).mount(document.querySelector('#app'))
最小的 createApp 只做两件事:把根组件包装成 VNode,然后交给 render。
export function createApp(rootComponent) {
  return {
    mount(rootContainer) {
      const vnode = createVNode(rootComponent)
      render(vnode, rootContainer)
    },
  }
}

export function render(vnode, container) {
  patch(null, vnode, container)
}
patch 的前两个参数分别是旧节点和新节点。首次渲染没有旧节点,所以传入 null;更新时两者会同时存在。这一对参数把初始化和更新放进了同一条主流程。
patch 负责分流
patch 先判断 VNode 的形状,再把工作交给对应的处理函数:
function patch(n1, n2, container, parentComponent = null) {
  const { shapeFlag } = n2

  if (shapeFlag & ShapeFlags.STATEFUL_COMPONENT) {
    processComponent(n1, n2, container, parentComponent)
  }
  else if (shapeFlag & ShapeFlags.ELEMENT) {
    processElement(n1, n2, container, parentComponent)
  }
}

function processComponent(n1, n2, container, parentComponent) {
  if (n1 === null) {
    mountComponent(n2, container, parentComponent)
  }
  else {
    // 更新流程留到下一篇
  }
}

function processElement(n1, n2, container, parentComponent) {
  if (n1 === null) {
    mountElement(n2, container, parentComponent)
  }
  else {
    // 更新流程留到下一篇
  }
}
到这里,初始化已经分成两条路径:组件需要先得到自己的渲染结果,元素则需要创建宿主节点。
初始化组件
组件 VNode 的 type 保存的是组件定义。直接改写用户提供的对象会让内部状态和公开配置混在一起,因此渲染器会为每次组件使用创建一个实例。
创建组件实例
真实的组件实例包含 props、attrs、slots、provides、生命周期和更新任务等大量信息。最小版本先保存当前流程需要的字段:
function createComponentInstance(vnode, parent) {
  return {
    vnode,
    type: vnode.type,
    parent,
    setupState: {},
    render: null,
    proxy: null,
    subTree: null,
    isMounted: false,
  }
}
这里的 vnode.type 是用户写下的组件定义,instance 则是这一次挂载产生的内部状态。即使同一个组件被使用多次,每个位置也会拥有自己的实例。
运行 setup 并准备 render
接下来执行组件的 setup(),保存其返回值,并确定最终使用的渲染函数:
function setupComponent(instance) {
  const Component = instance.type
  const setupResult = Component.setup?.()

  if (typeof setupResult === 'function') {
    instance.render = setupResult
  }
  else if (setupResult && typeof setupResult === 'object') {
    instance.setupState = setupResult
  }

  instance.render ??= Component.render
  instance.proxy = new Proxy(instance, PublicInstanceProxyHandlers)
}
为了让 render() 中的 this.msg 可以读取 setup() 返回的 msg,教学版使用一个很小的代理:
const PublicInstanceProxyHandlers = {
  get(instance, key) {
    if (key in instance.setupState) {
      return instance.setupState[key]
    }
  },
}
真实 Vue 的公开实例代理还会处理 props、data、context 和 $el 等公开属性,也会缓存访问类型。这里先只保留 setupState。
得到组件的子树
组件自己的 render() 返回另一个 VNode。我们把它记为 subTree,再把它交还给 patch:
function mountComponent(initialVNode, container, parentComponent) {
  const instance = createComponentInstance(initialVNode, parentComponent)

  setupComponent(instance)
  setupRenderEffect(instance, initialVNode, container)
}

function setupRenderEffect(instance, initialVNode, container) {
  const subTree = instance.render.call(instance.proxy)

  instance.subTree = subTree
  patch(null, subTree, container, instance)
  initialVNode.el = subTree.el
  instance.isMounted = true
}
真实实现会把这段逻辑放进响应式 effect。依赖变化后,同一个 effect 会再次运行,生成新的子树,并调用 patch(oldTree, newTree, ...)。初始化和更新因此能够共享同一条入口。
初始化元素
元素 VNode 最终要变成宿主环境中的节点。先定义浏览器版本的宿主操作:
const rendererOptions = {
  createElement(type) {
    return document.createElement(type)
  },

  insert(el, parent, anchor = null) {
    parent.insertBefore(el, anchor)
  },

  setElementText(el, text) {
    el.textContent = text
  },

  patchProp(el, key, prevValue, nextValue) {
    if (/^on[A-Z]/.test(key)) {
      const eventName = key.slice(2).toLowerCase()
      el.addEventListener(eventName, nextValue)
    }
    else if (nextValue == null) {
      el.removeAttribute(key)
    }
    else {
      el.setAttribute(key, nextValue)
    }
  },
}
事件部分依然是教学简化版。Vue 的 runtime-dom 会使用事件 invoker 来正确处理监听器更新、数组监听器和时间戳等边界情况。
有了这些操作,mountElement 只负责渲染逻辑:
const {
  createElement: hostCreateElement,
  insert: hostInsert,
  setElementText: hostSetElementText,
  patchProp: hostPatchProp,
} = rendererOptions

function mountElement(vnode, container, parentComponent) {
  const el = (vnode.el = hostCreateElement(vnode.type))
  const { props, children, shapeFlag } = vnode

  if (shapeFlag & ShapeFlags.TEXT_CHILDREN) {
    hostSetElementText(el, children)
  }
  else if (shapeFlag & ShapeFlags.ARRAY_CHILDREN) {
    mountChildren(children, el, parentComponent)
  }

  if (props) {
    for (const key in props) {
      hostPatchProp(el, key, null, props[key])
    }
  }

  hostInsert(el, container)
}

function mountChildren(children, container, parentComponent) {
  for (const child of children) {
    patch(null, child, container, parentComponent)
  }
}
数组 children 会再次进入 patch。如果子节点是组件,就先运行组件的渲染函数;如果是元素,就继续创建元素。递归会一直进行到所有叶子都被处理完。
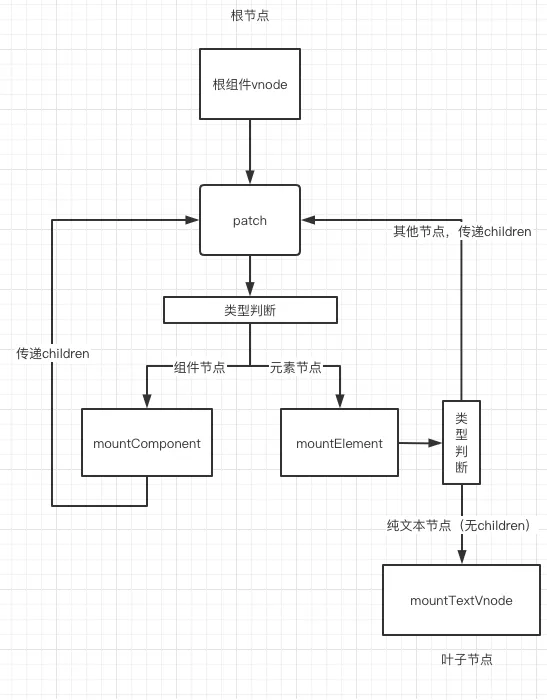
把主流程重新连起来
现在可以从入口顺着读完整个过程:
createApp(App).mount(container)创建根组件 VNode。render()用patch(null, vnode, container)开始首次渲染。patch()根据shapeFlag分派组件或元素。- 组件经过
createComponentInstance()和setupComponent(),运行render()得到子树。 - 子树再次进入
patch()。 - 元素通过宿主操作创建,props 和 children 被依次挂载。
- 数组 children 继续递归,直到整棵树完成。
这个最小实现还没有 props 与 emits、slots、生命周期、provide/inject、调度器、卸载、Fragment 和 hydration。它也没有处理任何更新。但骨架已经出现了:组件负责产生 VNode,渲染器负责解释 VNode,宿主操作负责把解释结果落到具体平台。
几年后重新读这篇文章,我发现真正值得留下来的不是某个函数当时位于源码的第几行,而是这三层关系。函数会移动,优化策略会继续变化;只要边界仍然清楚,新的实现就依然有入口可循。